minimoog_front Freemont's Office
Connect the AC cable between the Minimoog and a wall outlet. Connect a ¼" Unbalanced TS cable to an amp or mixer from either of the two MAIN OUTPUT jacks (LOW for guitar amps or guitar pedals, HIGH for a mixer input). Or connect a pair of headphones to the PHONES jack on the bottom right of the front panel. Turn the POWER switch to ON.

A look inside the iconic Moog Minimoog Model D synthesizer.
There are five circuit boards inside the Minimoog - A small board on the far left containing the power supply rectifier diodes and filter capacitors, to the right of that are four boards that contain all of the synthesizer circuitry. Some machines also have a tiny extra board for octave switching buffer IC's. The power supply boards
Moog Minimoog Model D im Test KEYBOARDS
Interesting bit on the front panel de-lamination starts at 2:33. Curious what he uses to get the glue off. "Hey guys, This is a look at a minimoog restoration I did for Bruce Hendrix. this minimoog still played decently but was definitely in need of some cosmetic TLC. Thank you Bruce for the opportunity to restore your minimoog.
Minimoog
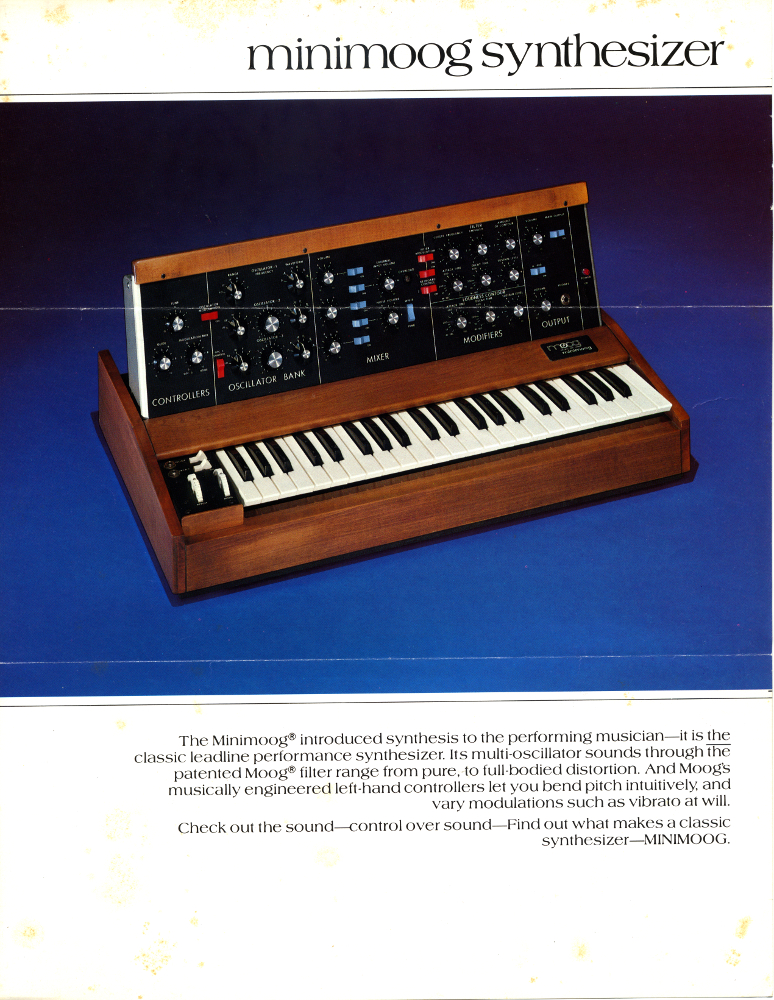
The Model D was born. Along with a story that foreshadowed its future. Iconic. The Minimoog is more important than the Les Paul. There wasn't a Fender Telecaster to rival the Model D's rebellion. Alone, the Minimoog transforms synthesis from a white lab coat world filled with knobs and plug bays and cables that resembled telephone.
Moog Minimoog Model D
I decided that $110 for the front panel press-on label was not in the budget. Since the rocker switches I used are different from the Moog ones, the press-on front panel label would not have really worked for me anyway. The Radio Shack knobs are pretty close to the smaller Moog knobs, at about 1/4 the price.

How To Use A Minimoog Synthesizer YouTube
minimoog voyager xl: brown wood with black panel. price : $4,995.00. minimoog voyager xl: white. price : $4,995.00. designed in celebration of the 40th anniversary of the minimoog, the minimoog voyager xl is a sonic powerhouse that pays homage to important milestones in the moog synthesizer legacy. it starts with the heart of a minimoog model d.
MATRIXSYNTH Modified Moog Minimoog Model D Synthesizer + Flight Case
The front panel aluminum is exactly 7" high. From the front of the front panel to the back of the bends at either end is ~0.4". The power supply pcb support standoffs are 3.15" apart, ctr to ctr. From the outside of the top panel left edge to the closest edge of the left standoff (from the rear) is 6 3/16" (6.19") .

MATRIXSYNTH Stripped Moog MiniMoog Front Panel
The MME is a DIY project that lets you build a Minimoog clone in 60hp, the same as Moog's Euro format synths: The MME offers several additions to the Minimoog Rev 2 design:. The Behringer D front panel design is a bad, obvious ripoff of the Minimoog, the switches and pots are garbage and Behringer clearly chose cheap build over accurate.

MATRIXSYNTH Stripped Moog MiniMoog Front Panel
01. The story of how I got my Minimoog. 02. Minimoog Operation Manual Downloads in PDF format. 03. Where to buy a quality copy of the Minimoog Op/Tech Manuals. 04. Minimoog Technical Service Manual Schematics in GIF format. 05. Minimoog Technical Service Manual Replacement Parts Lists in GIF format. 06.

MATRIXSYNTH Restored Vintage Moog Minimoog Model D with Mods
The Minimoog is the first synthesizer that incorporated the synthesis circuits of the big modulars of the sixties and early seventies, and made a hardwired, portable keyboard synth available for keyboardplayers and bands. There were 4 revisions, A-D of which the Model D was the final production model. Model-A Prototype - Built in 1969.

MiniMoog Model D Roadcase Moog, Road cases, Synthesizer
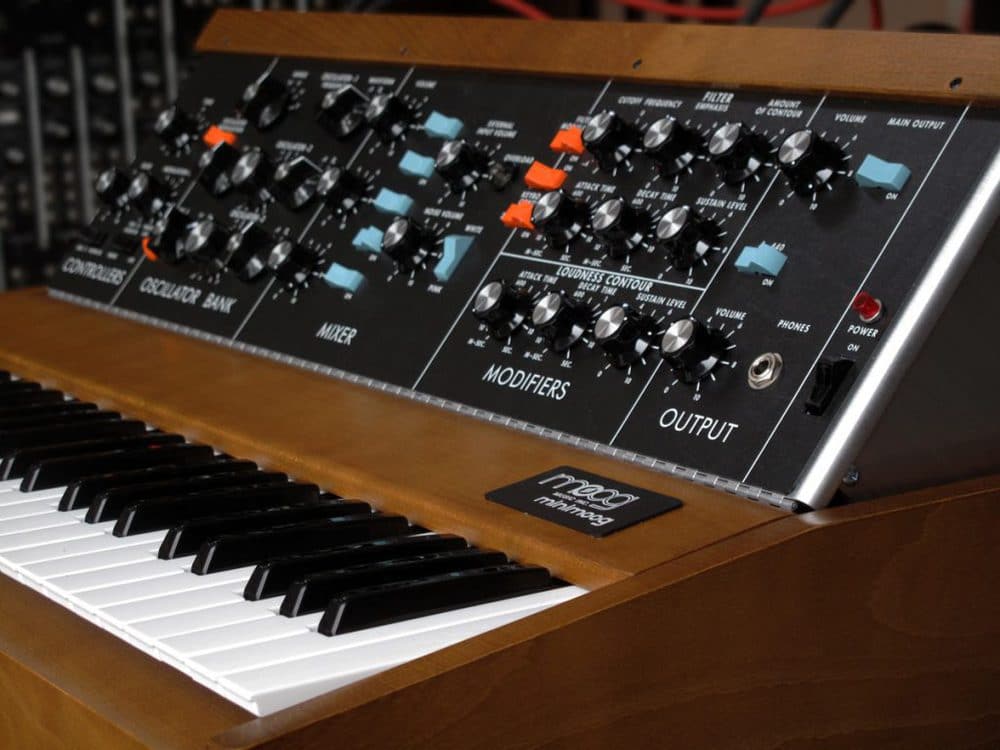
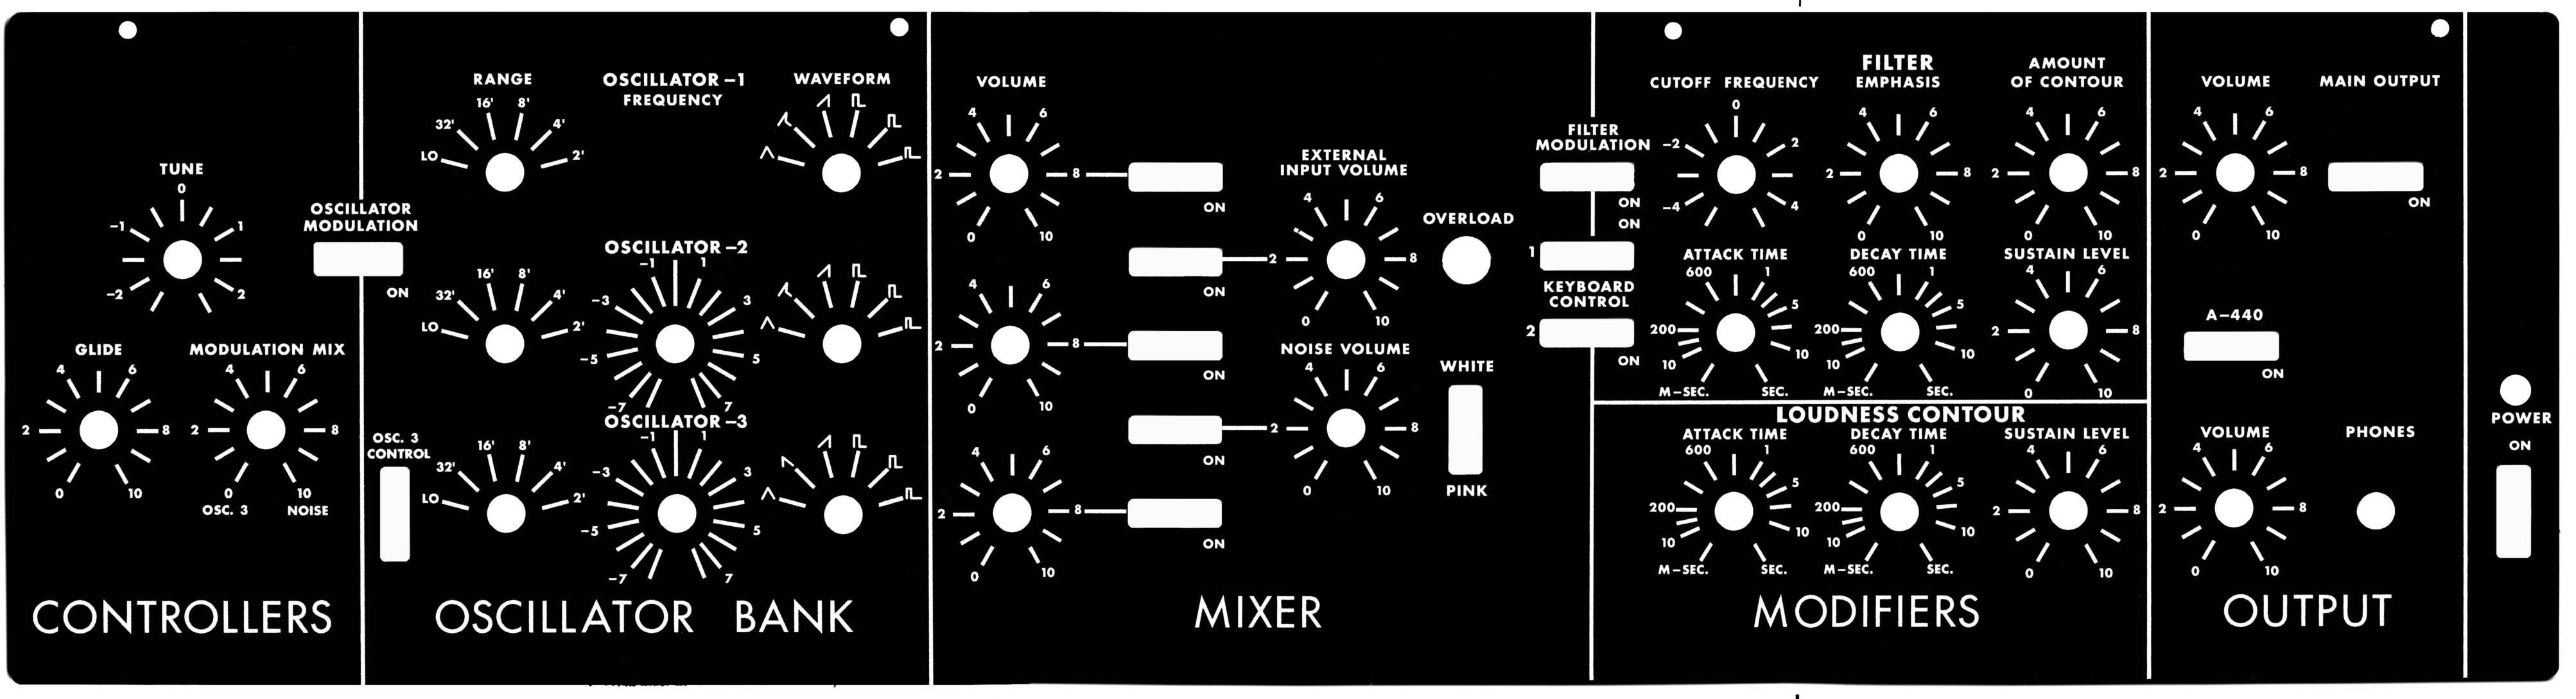
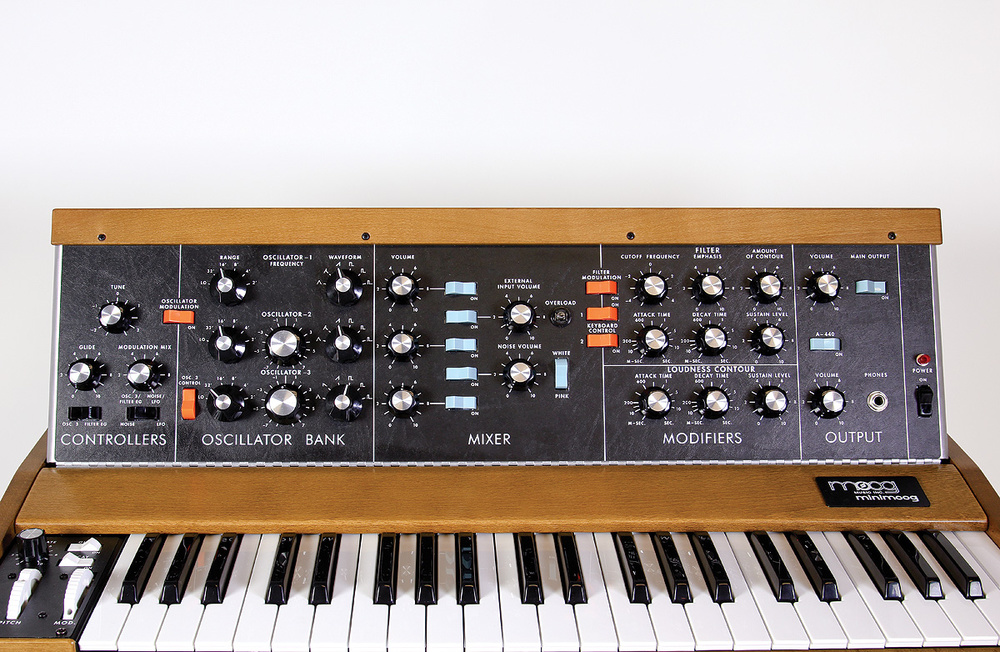
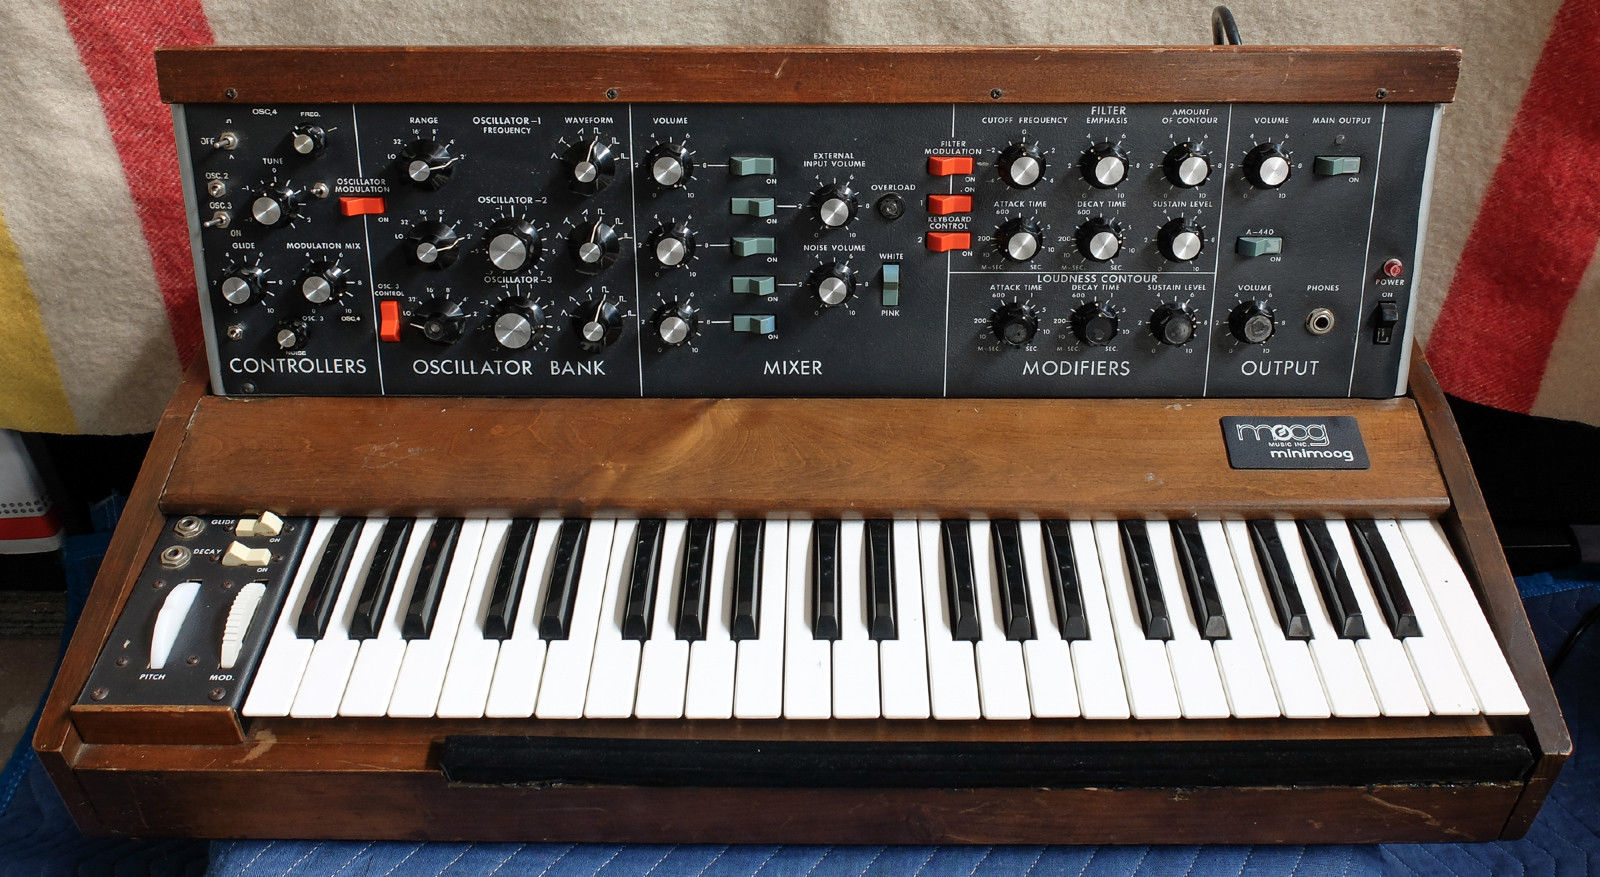
The Minimoog's internal wiring configuration and front panel layout has defined the general synthesizer configuration for decades. Every adjustable parameter is so clearly laid out on the front panel that the Minimoog makes a great teaching tool for anyone interested in classic subtractive synthesis.

MATRIXSYNTH Stripped Moog MiniMoog Front Panel
SETUP & CONNECTIONS The front panel of Minimoog Model D is hinged, so use caution and avoid grasping the top of the panel when lifting or moving the instrument. Place Minimoog Model D on a stable surface, such as a table or keyboard stand. Be sure the instrument is placed at a comfortable playing height. Page 12: Creating Sound

MATRIXSYNTH The Moog Model A, B and C Minimoog Prototypes at Synthplex
THE FRONT PANEL (Construction of the front panel behind the knobs) * Metal - A thin sheet of smooth aluminum. * Metal with Plastic - same as above, but with a thin clear sheet of plastic to cover/protect it. * Plastic - a heavier vinyl/plastic panel, with a textured surface. GRAPHICS (This is the silkscreened labelling on the front panel) * "VOL."

Minimoog Model D goes into popup production
The purpose of this manual is to acquaint you cuitry of the Mini Moog and the operation of and switches regulating the generators, modifiers, involved in the synthesizing of a musical sound. step by step through the instructions outlined ready to begin using your instrument creatively B. BASIC MINI MOOG FEATURES
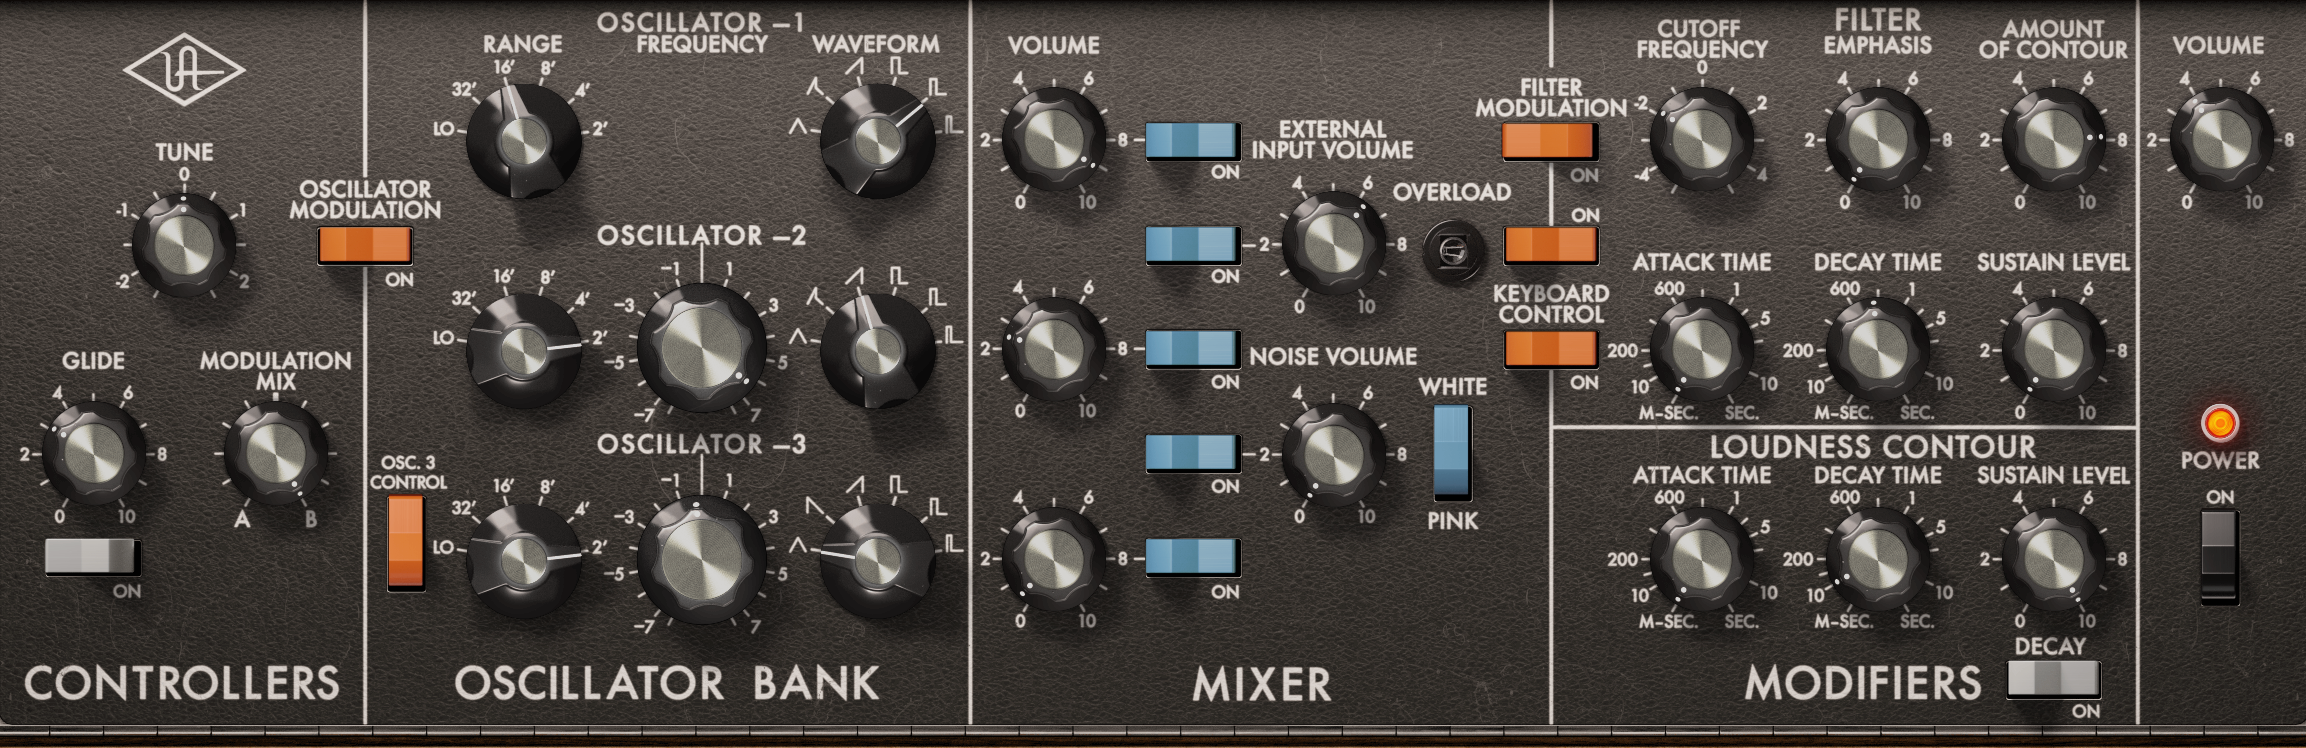
Moog® Minimoog Manual Universal Audio Support Home
Moog Minimoog Model D Home Reviews Moog Minimoog Model D Analogue Synthesizer Synthesizers By Gordon Reid Published August 2016 Soon, for the first time in 35 years, you will be a able to walk into a shop and buy a brand-new Minimoog. But will it be as good as the original? Find out in our exclusive review.

MATRIXSYNTH Moog Minimoog Model D Synthesizer Pristine Rare Early
December 06, 2023 10:53 Moog® Minimoog Manual This article includes: About the original hardware Universal Audio's approach to Minimoog The original hardware and the UAD instrument Quick Start Overview Main Panel Modifications Panel Performance Tips & Techniques Automation
